Making and Remaking

Tiny Stuffies | Red Circle Crafts

I’ve got tiny things on the brain lately. These tiny stuffies came out of some strange need to miniaturize everything. Usually I only show here what I consider the final version of something. But I thought it might be interesting to see what it looks like when I’m making and remaking things trying to get it just right.

Tiny Stuffies | Red Circle CraftsTiny Stuffies | Red Circle Crafts

The sharks are actually a mini version of a larger plush toy I make for Karen’s Monsters. But I wanted to see what it would look like tiny. Despite the fact that I’ve made hundreds (or thousands) of these, the blue one didn’t turn out as well as I’d hoped, but he has his own appeal. There’s something about the wabisabi that makes him loveable.

Shark1Tiny Stuffies | Red Circle Crafts

In this case, while I used the exact same pattern to make these, I think they look remarkably different. Just a few tweaks makes something that meets my weird standards of what it’s supposed to look like. My own vision of what it should look like sometimes gets in the way of what’s best though.

Tiny Stuffies | Red Circle Crafts

The blue-tailed mermaid was my first try. And while I think the green-tailed lady is better constructed, the first is actually the running favorite around here. I think I have a lesson to learn somewhere about not needing to be perfect and letting good enough be good enough.

Tiny Stuffies | Red Circle Crafts

Also how much fun are these wave props I made for the mermaids? And I definitely missed an opportunity to pose the shark monsters among them, with just the back fin showing.

My only requirement to make the ladies was that they had to be under 2-inches in any direction. I don’t know that I’ve ever made a plush toy this small before. It meant editing out a lot of details and trying to get just the pieces that would make it obvious what it was. Felt typically doesn’t show tiny details well (see almost invisible scales on the tails), so I didn’t want to depend on lots of subtly. Bright lips, shell bra, cascading hair, and tail. Boom. Mermaid.

Tiny Stuffies | Red Circle Crafts

2016 Monthly Planner – Free Printable & DIY

2016 Printable Planner DIY | Red Circle Crafts

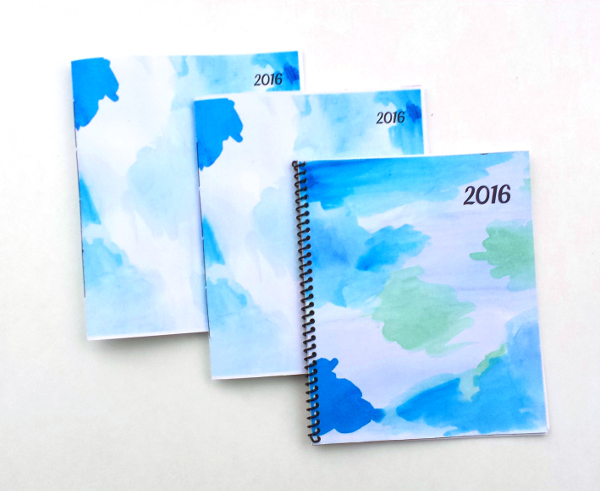
Last January my Mom was complaining that all of the planners that were organized the way she wanted weren’t aesthetically pleasing. I believe she called them boring. So I made a plan to put together one to her specifications that wasn’t boring. And even though I worked on it a little all year, the final push to have it done didn’t quite make the January 1st deadline. But I’m thinking that even if you don’t start this on January 1st, you might enjoy using it for the rest of the year.

Doing the planning to make all the pages turn out in the right order was really complicated. Putting this together into a booklet is really easy.

Each month has a double page calendar, a water color image with a quote by an awesome lady and room for notes. Check out the printables below for a good look at the quotes and my water color paintings.

Download Cover Here

Download Inside Pages Here

2016 Printable Planner DIY | Red Circle Crafts

When you print the Inside Pages on legal paper and use the following settings:

  • Page Scaling: None
  • Choose Paper Source By PDF Size
  • Print Double-Sided, Flip on Short Side

It’s only 12 sheets (24 pages) long, so by all means take it to a copy center if you’d like. But it should work just fine on a home printer too.

2016 Printable Planner DIY | Red Circle Crafts

Materials Needed:

File Folders
Ruler
Pencil
Push Pin
Needle & Thread (I like button thread for binding)
Craft Knife (Option 2 Only)
Spray Adhesive (Option 2 Only)

Ok, now you need to make a choice.

Option 1 – Print and Go

You can cut all the pages in half and spiral bind them (just flip one half onto the other as if you were closing a book or folding the pages in half with the Gloria Steinem Quote facing up of the whole stack of pages). I recommend using some press board, card stock or other heavy weight material as covers. Decorate as you choose or with the cover pages I’ve made. (Most copy centers will do all of this except the decorating for you.)

Option 2 – Soft-Cover DIY

This option includes a very simple binding stitch (not at all complicated, I promise) and a soft cover.

Print out the Cover on a sheet of legal paper. (I used 32lb paper for this and the inside printed on 24lb, but the difference is pretty negligible.)

2016 Printable Planner DIY | Red Circle Crafts

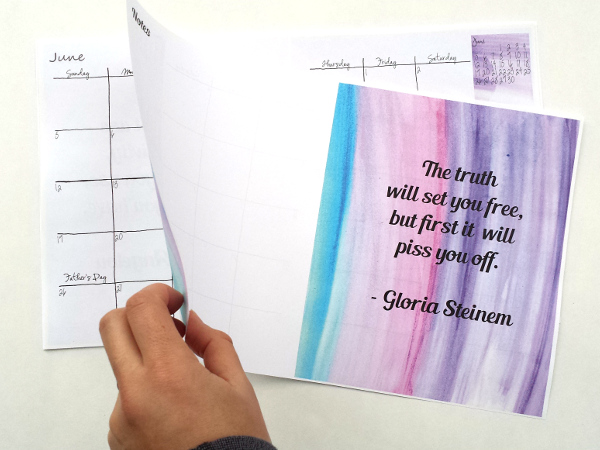
Take all of the pages in order, with the cover on the bottom (blank side face up) and the Gloria Steinem Quote on top. Now fold each page in half, long-wise (hamburger style), keeping them all in order. Stack them in the same order inside of each other, now the cover should be on the outside and Gloria Steinem Quote is one of the middle pages.

2016 Printable Planner DIY | Red Circle Crafts

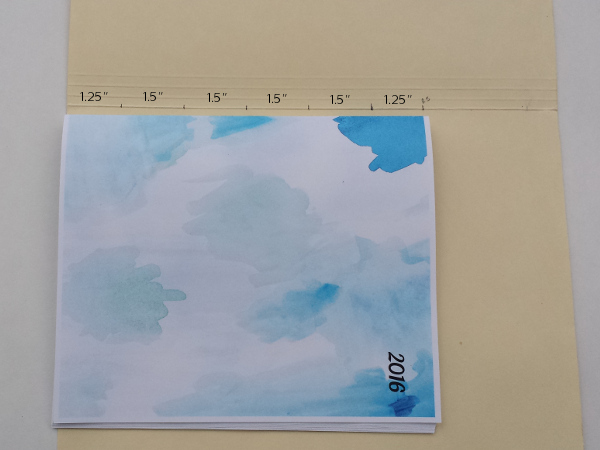
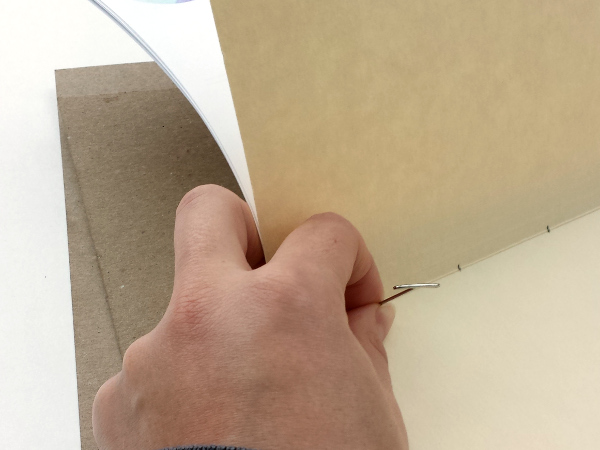
We need 5 holes in exactly (or as close as you can manage) the same place on the fold of each page. Take a beat up file folder and measure out 5 holes on the crease. Mine are located 1.25″, 1.5″, 1.5″, 1.5″, and 1.5″ (from the edge and then each other). Take the whole stack of pages and place the file folder inside them with the folds lined up and whichever edge you measured from flush with the paper. Paperclip it all in place.

2016 Printable Planner DIY | Red Circle Crafts

Take the some scrap cardboard, a cutting mat, or some other surface you don’t mind poking some holes in and the pushpin. Making sure to keep everything aligned, press the pushpin through each hole mark you made on the file folder and all the way through all the pages behind it.

2016 Printable Planner DIY | Red Circle Crafts

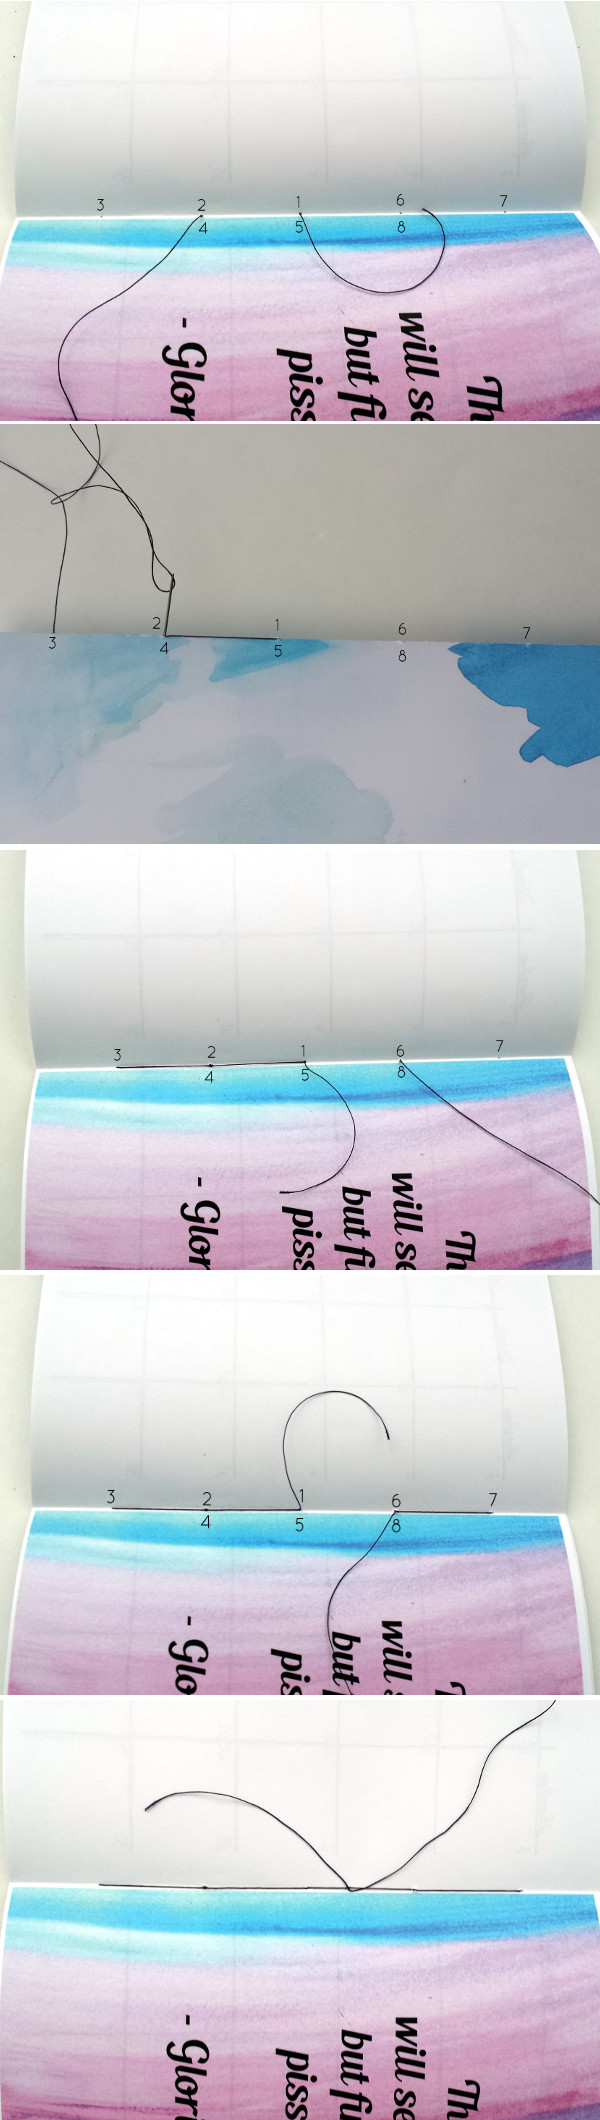
Remove the file folder and gather your needle and thread. Start inside the booklet at the middle hole (1) and go down through all the pages, leaving a tail inside. Come up through hole 2 and down through the far left hole (3). Back up through the previous hole (4) and down again through the middle hole (5). And up through hole 6 and down through the far right hole (7). Then back up through the previous hole (8). You should have the beginning and the end of the thread both inside the booklet near each other. Make sure all of your thread is pulled taut and then tie a knot and trim the thread. See the photos for more clarification. It’s not a complicated process, but it’s easier to show than to tell.

2016 Printable Planner DIY | Red Circle Crafts

2016 Printable Planner DIY | Red Circle Crafts

Option 3 – Hard Cover DIY

This option is just like Option 2, but with the added step of a hard(er) cover. I think file folders make great notebook covers. Find a file folder that isn’t too beat up and is pretty clean inside.

2016 Printable Planner DIY | Red Circle Crafts

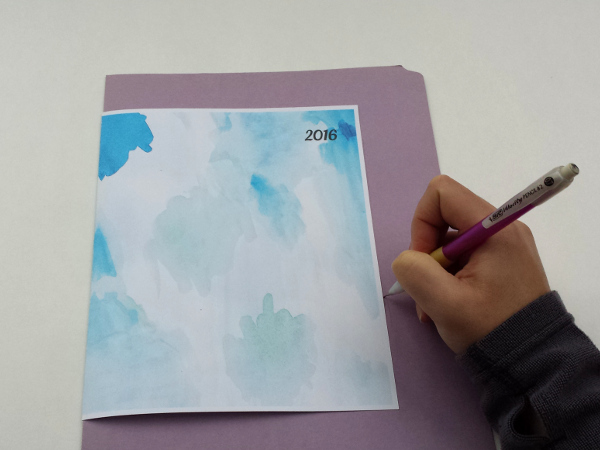
Lay it open flat, outside face-up. Put the cover print out, with a crease mark from folding, but opened up on the file folder with the creases lined up. Mark the edges of the cover with a pencil.

In a well-ventilated area spray the spray adhesive so that it entirely covers the area you marked. The edges are really important to get.

Some tips for spray adhesive:

  • Shake the can really well before you begin.
  • Spray on something you don’t mind getting sticky, and then move off of it to align so you don’t risk getting errant spray adhesive on the wrong bits.
  • Let the item being sprayed sit for a minute after spraying before attaching for best adherence.
  • Line up one edge of the non-sticky piece and slowly lay it down smoothing it out as you go. Use a credit card or similar item to press out any possible air bubbles.

To attach the cover so it will bend well, I folded the file folder like a tent and started at the fold on one side and pressed the cover in place and then the other side. I made sure I could fold it completely in half and pressed it down and then opened it back up and pressed out air bubbles starting from just shy of the fold on each side.

2016 Printable Planner DIY | Red Circle Crafts

After you have the cover attached to the file folder, take a metal straight edge and craft knife and trim the excess file folder.

Now you have a thicker cover for your planner. See Option 2 for binding steps.

2016 Printable Planner DIY | Red Circle Crafts

I’m surprised how much I like mine with a soft cover. I’m excited to start using it.

2016 Printable Planner DIY | Red Circle Crafts

2016 Printable Planner DIY | Red Circle Crafts

Balsa Wood Tutorial Round-Up

I saw tons of balsa wood ideas for Christmas decor floating around the internet this year. I don’t have a ton of experience with it, but it seems like exactly what I need. It’s wooden, but can be worked like cardboard. It’s light-weight, can be cut with scissors or a craft knife, and painted, stamped, printed on, etc. like you would wood. So I went and looked up some non-holiday related tutorials. Maybe some new projects in the future!


DIY Balsa Wood Planter from Fall For DIYThis planter from Fall For DIY might be my favorite tutorial I found. I love how easy the project is and how amazing the end product is. The texture that comes from layering so many not quite perfect circles together is wonderful!


DIY Wood Matting from Eat + Sleep + MakeThis Balsa Wood Mat technique from EAT + SLEEP + MAKE would make an exceptional frame job.


Gemstone Garland from Tell Love and PartyYou know I’m sucker for garlands. I like the Gem Stone Garland from Tell Love and Party, but I can see this as a gateway to creating garlands of all shapes and sizes from a little paint and balsa wood.


Print onto Wood DIY from Oh The Lovely ThingsThe last is a technique more than a project tutorial, but I think it expands the sorts of things I’m thinking about doing with balsa wood. This tutorial from Oh The Lovely Things shows how to transfer any inkjet printed image onto wood.

Photos in this post all belong to their respective, linked sites.

Happy Christmas

Merry Christmas from Red Circle Crafts
I’m taking a short break from blogging to properly enjoy the holidays. Which, I must say, have not been nearly so enjoyable (read: low-stress) in years. I’ve got a few surprises up my sleeve though, so I’ll see you shortly before the new year, back right here.

If you’re celebrating any holidays of light in the darkest time of the year, I wish you a very merry celebration, whatever that entails.

Tiny Weaving Ornaments

Tiny Weaving Ornament | Red Circle Crafts

Every year I make a series of ornaments that I mostly give away to friends and family. This year I made many more than I needed (weaving is a little addicting) and I’ve put some of them up in my etsy shop for sale. I would order soon to be sure they arrive before Christmas.

Tiny Weaving Ornament | Red Circle Crafts

One of the things that I really enjoyed about making these weavings is how deceptively simple and rustic they are. They hang from twigs collected from my walks and include a piece of string to hang from a tree or the wall.

Tiny Weaving Ornament | Red Circle Crafts

Felt Advent Calendar

Felt Advent Calendar | Red Circle Crafts

I’ve finally finished an advent calendar and just in time, too. I was sewing the hangers onto these ornaments last night. And finished photographing this today!

Felt Advent Calendar | Red Circle Crafts

I love advent calendars and have since I was little. But I wanted one that I could use year after year without needing to purchase or make anything every year.  I was inspired by this advent calendar from The Sugar House Shop (pattern available for purchase).

Felt Advent Calendar | Red Circle Crafts

The reindeer head is a silhouette I liked the look of, found through a google search and modified slightly to fit. After sewing the whole head and antlers on by hand, I sewed in small brown seed beads to use as hangers for the ornaments.

Felt Advent Calendar | Red Circle CraftsFelt Advent Calendar | Red Circle Crafts

The pockets are made from the same white felt as the background with numbers embroidered on to each pocket. I just took a water-dissolving pen and wrote numbers on each pocket space (before sewing it in place) and then embroidered (using a back stitch) the numbers.

Felt Advent Calendar | Red Circle Crafts

The tiny felt ornaments are entirely hand-drawn patterns made to fit in the tiny pockets.

Here’s a list of plushies and felt ornaments that inspired these:

Bear & Owl
Vintage Glass Ornaments
Dala Horse
Rudolph & Santa
Yeti
Tree

I’m looking forward to putting up one ornament every day until Christmas, seeing the reindeer fill up with bright baubles.

Felt Advent Calendar | Red Circle Crafts

Being Thankful

Happy Thanksgiving from Red Circle Crafts

I have a lot to be thankful for this year. Most of all I’m happy to have put further roots down in Portland and feel like I have a great group of friends that I’ve grown closer to this past year.

J and I had the chance to do a huge amount of traveling this year. More than even we realized. So we’re looking forward to a quiet holiday season here at home.

Hope you have a very happy Thanksgiving if you’re celebrating today.

Cloth Napkins Embroidery

Embroidered Napkins - Free Pattern | Red Circle Crafts

‘Tis the season for making presents. I tried to get started early this year, because I always feel rushed the last few weeks before Christmas trying to get everything done. I’m not sure that I’ll be successful at keeping myself from getting stressed out or just put more expectations on myself. Time will tell. If there’s a secret to not getting stressed out at this time of year, I’m sure I haven’t discovered it. Luckily I get to spend a lot of time with people I care about and eat lots of delicious food, so it totally balances out.

Embroidered Napkins - Free Pattern | Red Circle Crafts

I’ve been slowly working on these napkins for a few weeks now. I wanted the embroidery to be almost as pretty from the back as that front. You can’t hide the back on napkins the way you can on some other things. Plus I was worried about them going through the wash with all my stitches in tact, but joy of joys, these napkins survived a trip through my washing machine without issue. So slow careful stitching was the name of the game with these. I think the extra care really paid off though.

Embroidered Napkins - Free Pattern | Red Circle Crafts

This is the basis for the pattern I used*. (Click on image to open and save.) I drew in crazy curved lines to fill in the heart instead of a more traditional satin stitch and I added initials to each of the hearts. I wish I’d made the letters slightly larger. I’m afraid there isn’t enough negative space in the letters to really understand what you’re looking at. But live and learn.

Embroidered Napkins - Free Pattern | Red Circle CraftsEmbroidered Napkins - Free Pattern | Red Circle CraftsEmbroidered Napkins - Free Pattern | Red Circle Crafts

I’m hoping the recipient of these enjoys them. I know she uses cloth napkins every day, and I love having monogrammed napkins so that they don’t get mixed up between meals.

*I modified a free pattern from Flamingo Toes to make these.


Christmas Card Garland

Printable Christmas Card Garland | Red Circle Crafts

I wanted to do something a little different this year for a Christmas Card. And while this doesn’t leave a lot of room to write a note, it does give the recipient a small bit of holiday cheer to hang where they please. J and I will write small notes on the holly leaves to personalize them.

I don’t usually start my Christmas cards until after Thanksgiving. But I know some people like to get a head start on these things.

Printable Christmas Card Garland | Red Circle Crafts

They’re really simple to make. I’ve made a Printable Download for you.

Print this on heavy card stock.
Cut out each piece carefully. (I left a little white, but it’s up to you!)
Use approximately 36″ of string or bakers twine.
Tape (with tiny pieces of scotch tape) the string to the back of each letter.
Carefully fold up and put in an envelope to mail!

Printable Christmas Card Garland | Red Circle Crafts

Don’t forget to make one for yourself to keep.

Printable Christmas Card Garland | Red Circle Crafts


Napkin Ring Tutorials

One of my favorite things about Thanksgiving has always been setting the table. Growing up it was one of the few times that we brought out the fine china and I was tasked with making place settings and decorating the table. While it might have been an excuse to keep me busy and out of the kitchen, it was also something that I loved.

If you’re planning to bring out the china and cloth napkins for the upcoming holidays, here are some lovely napkin ring tutorials for you.

Popsicle Stick Napkin Rings from RuffledThese colorful napkin rings from Ruffled are made from popsicle sticks. You could decorate them to match any color scheme.

Faux Ceramic Napkin Rings from Almost Makes PerfectAlmost Makes Perfect has an easy tutorial for these Faux Ceramic Napkin Rings. They’re made from oven-bake clay with a glaze painted on top to give them a professional ceramic look.

Fresh Flower Napkin Rings from Paper & Stitch
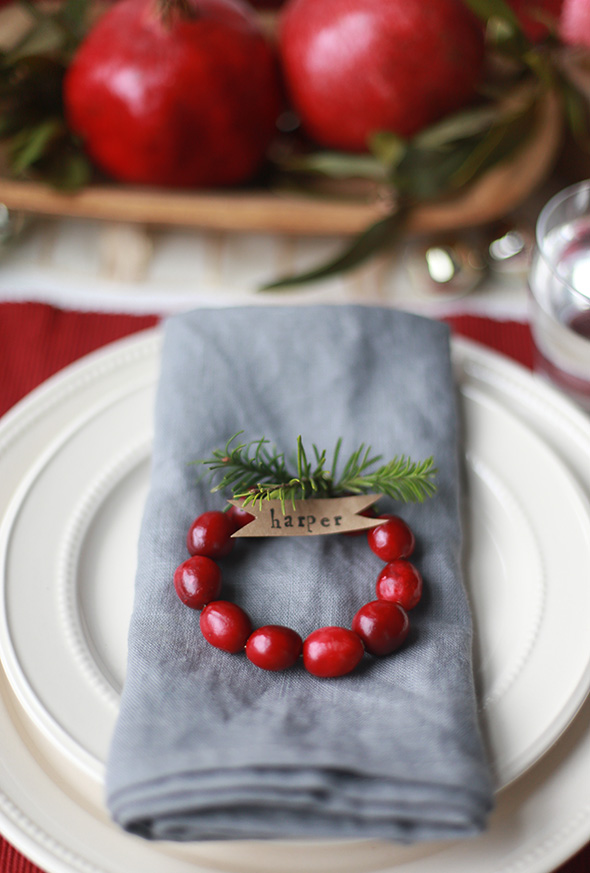
These Fresh Flower Napkin Rings from Paper & Stitch look pretty spring-like, but with the right flowers and leaves, they could be entirely autumnal. I love the fact that they use natural materials.

Cranberry Wreaths from Say YesFresh cranberries make a beautiful place setting, as Say Yes shows in this tutorial, but would also be lovely as a napkin ring. While it was originally intended for a Christmas DIY, cranberries scream Thanksgiving to me, maybe without the bit of pine though.

All photos in this post belong to their respective and linked sites.